Installation Instructions
![]()
- Create the Database
Using standard Microsoft SQL Server tools, create the database to store DataLog sales.
- Run the Database Creation Script The file DBSchema.sql contains the commands to create the tables and stored procedures used by the program. This script could take up to 2 minutes to run.
Method A) Use Query Analyzer to open and run the file
Method B) Use the command line program to run the file osql.exe

You should see some output that looks like this:
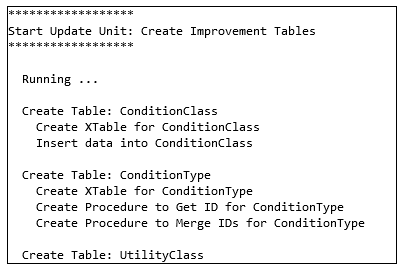
The last line of output should read:

3. Run the Script to Load any Database Modifications
Any additional changes will be in files marked with the release numbers. Run these files in order of their release. For example “1.0.2.sql.”
4. Run the Script to Load the County Table
Using the same setups as above, run the file insertCounties.sql to load the County tale. THis script could take up to 2 minutes to run.
This will produce a number of rows like:

5. Add SQL Server Logins for the User or Groups That Need Access
The setup in the program can assign users to the Database and Database Roles, but it does not create the Database Login. Using Enterprise Manager, grant Server access to the appropriate domain users who need it.
6. Ensure That the First User Doing Setup Has Access to the Database
The first user that will be adding other users to the database need to have access to the database. If the same user that is running the database scripts is running t5he DataLog, this is not a problem. Otherwise you need to be aware that Server Logins are different from Database Users.
7. Run the DataLog Install
8. Set Database Connection Strings
Under Edit->Configuration the “System Configuration” tab adds the connection strings for the Database. The default string should be:
![]()
If you are only using a single database the “Read Only Connection” string can be left blank.
9. Add Users to the Database Role
Using the tool “Database Roles” found under Server Setup, add the needed users to the correct Database Roles.
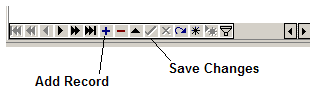
Note on Server Setup grids:
When making changes to server settings, the buttons at the bottom of the grid are used to add and save changes to the record. A green check is used to save changes and the blue plus is used to add records. Clicking between records will also cause the changes to be saved. However when adding the first record to a table you must use the green check.
The Setup tables do not have all the checks to display friendly messages when invalid data are entered. If you try to enter invalid data you may see an error message that is not user-friendly. However, it does explain which data are invalid. You can use the Continue Application button, correct the problem, and then try to re-save.
10. The last steps to take are to set up an Access Group and to set up a Rule Set.